Sunday, February 27, 2011

Beads Of Courage - Last Day to Donate

Marcy Lamberson of Studio Marcy is giving away a torch she won! For every $25 donation or 25 beads donated, you get one entry! Since I've been otherwise occupied...working too much... I got busy and found well over 100 beads that I made just lingering in my bead bowl and rounded it up with beads from my jewelry making stash. Monday, I'm shipping all 200 to Beads of Courage. The last day to enter... so typical of me!

If you want to get in on the fun, read about it on the blog Marcy set up for the event. Beads of Courage is such an amazing charity and I'm so lucky that the BoC folks will be in Orange county in April to kick off a chapter out here in So Cal! I'll be blogging about that for sure.

This strand is some of my first beads... I love some them still... the silver and the reactions! Oooh! 

Thanks for checking in! I'm still here... and I miss my torch!

This last set is from my beading stash. I didn't make them but I'm more into bead making than jewelry and I know they will have a good home now!

Monday, February 14, 2011

Fire Divas Jewelry Challenge

OMG! I'm on such a beady high!!!  Three of the entries in the Fire Divas latest jewelry challenge feature my beads.  We've had many challenges where I had no beads used in the gorgeous entries. But, I've always donated prizes! What better way to get my beads "out there" than get them into the hands of award winning designers? Seems like Marketing 101 to me! Well it paid off this time in spades.

I'm even more thrills that the three beads...look nothing alike! My loyal fans know that I struggle with the fact that I don't have a "schtick" - a look - a thing... something that sums up my work in a sound bite. She makes cute little sets, primary colors, silvered ivory rounds...whatever. I can't seem to settle down and work on any one thing. But I do love focals and that's what all three designers used.

My fellow Divas Lori Bergmann of Ashlyn Design and Janel Dudley of Janel Dudley Beads also have some wonderful beads in the competition! And Janel is also represented in one of my focals... I use HER eye bead tutorial and her millefiori in the eye bead!

Voting: Please vote once on the right side of the Fire Divas blog. Voting poll will be up for one week. Winners will be announced shortly after the polls are closed on the Fire Divas Glass Bead Blog.

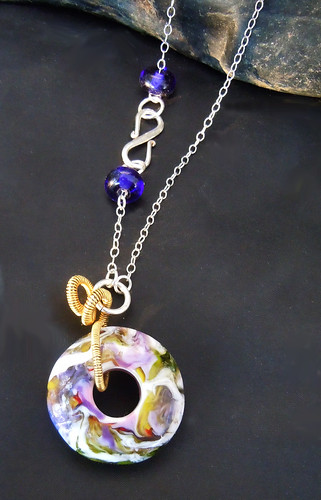
Our first entry is a beautiful necklace featuring a bead by Ashlyn Design and some stunning wire work:
Entry #1
In The Garden

Designer Info: Scott Bjorge. Gallery 
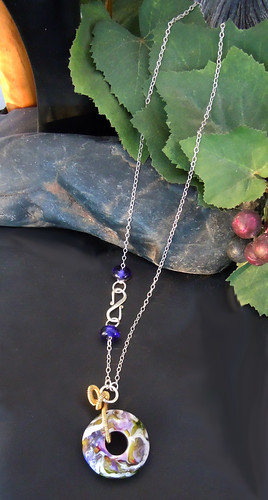
Designer's Description: As we enter the heart of winter it is nice to think of our beautiful Spring gardens to escape the cold and snow. This lovely focal bead by Ashlyn Design inspires that feeling with it's blend of an array of lovely colors. Designed with a sterling silver 's' hook accented with two more beads from Ashlyn Design brought around to the front to become part of the design.

In The Garden

Our second entry is also an "eye catching" necklace featuring an eye bead by Holly's Folly and natural and metallic beads.
Entry #2
Eye of Horus focal
Designer Info: Michelle Plumb Gallery Contact: maplumb1 {at} wowway (dot) com
Designer's Description: Eye of Horus necklace, with focal by Holly Dare of Holly’s Folly and eye murrini from Janel Dudley Beads. I’m fascinated by ancient Egyptian history, so this bead called me immediately. The necklace was made with Holly’s Eye of Horus focal, graduated lapis lazuli rondelles, turquoise rounds and gold-plated rounds. Fit for a Pharaoh!

Eye of Horus necklace


Entry #3 is rich with silver and glass baubles from Janel Dudley Beads
Entry #3


Designer Info: Mary Elam / Stella's Blossoms
Designer's Description:  Boro Blues is inspired by the beautiful blue fire within each of these lovely beads by Janel Dudley. The brilliant shades of blue and aqua truly radiate goodness from within. Each Boro bead is accented with Bali Sterling silver beadcaps. I've included my favorite Bail sterling silver focal bead in a unique oval shape to compliment the design. Swarovski crystals add extra sparkle. A thai silver toggle closure is included.


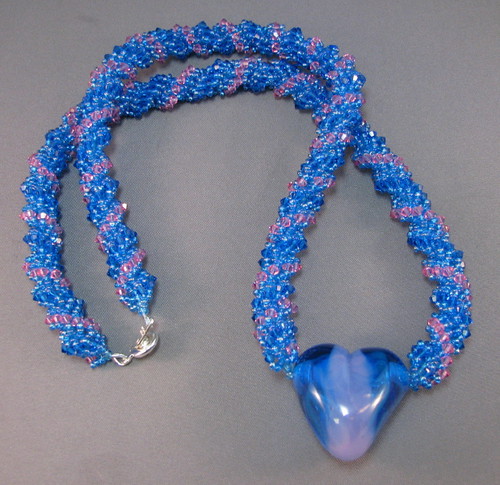
Our fourth entry is a double spiral of Swarovski crystals with a hollow heart by Holly's Folly. 
Entry #4

Twisted Heart
Designer Info: Gretchen Coats Etsy Blog  Gallery
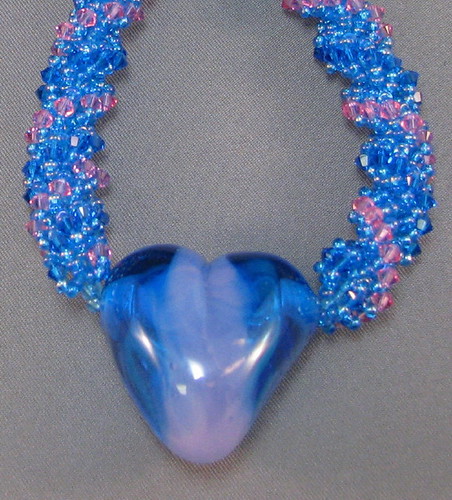
Designer's Description:  This 24" necklace is made up of close to 600 3mm swarovski crystals in a double spiral. The Focal bead is made by Holly of Holly's Folly Glass, and the crystals and seed beads match the blue and pink of the focal bead perfectly! Heart is actually hollow, and upon closer inspection you can see 
the smaller beads run through the center of it!
Twisted Heart detail

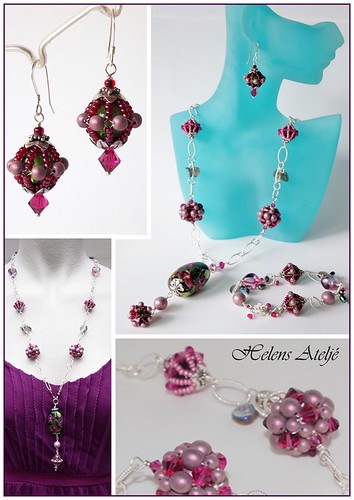
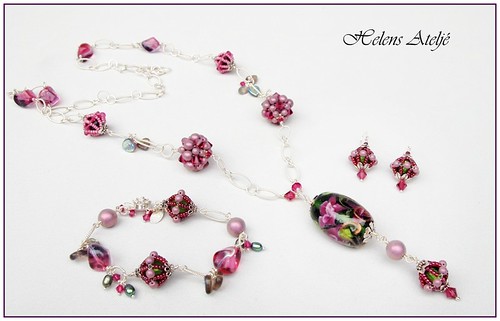
Our fifth and final entry mixes pearls, crystals, pressed glass and seed beads with a floral focal from Holly's Folly .
Entry #5
Romance in pink collage
Designer Info: Helen Aresik / Helen's Atelje
Designer's Description:  Romance in pink. This design is based and inspired on the beautiful and wonderful, handmade lampwork bead made by Holly's Folly. When I look at the Focal bead I think of a beautiful garden with pink flowers. I’ve chosen beads and other findings to match the pink and green tones in the focal bead. I made some beaded beads myself with pink beads with a green bead inside, inspired of the deep green color inside the focal bead. I also used chain and findings in sterling silver, some swarovski crystals, freshwater pearls and other glass beads and leaves. The necklace is 80 cm long excl. the pendant, which is 10,5 cm. The focal bead is almost 4 cm long. The bracelet is 21 cm long and the earrings are 3 cm long without the earhook.

Romance in pink


Friday, February 11, 2011

Red Velvet

As a Southerner, I adore red velvet cake. And I'm pretty picky about it too! So many chefs get it all wrong! Good thing I make cupcakes of glass ;-)

I was surprised to find my red velvet cupcake glass bead in a red velvet collection on Artfire! Check it out... there's some fun stuff here!


Monday, February 7, 2011

Hearts Still Shipping...

I had planned to get on a more regular blogging schedule last week and then I was knocked sideways by allergies. I've coughed so much, my back hurts! Today, I'm finally feeling human...but I still don't have my taste buds back. I've decided my skills as a super taster are no longer an asset! I've discovered, if I can't taste, I don't have much of an appetite. If I could lose my taste buds permanently, maybe I'd finally be a skinny girl??? Eh...one can dream, right?

Just wanted to pop in and remind you that there's still time to heart someone special (or yourself...YOU are special!) in time for Valentine's Day!

Duo Glass Bead Heart - Black & White on one side / color on the the other. 

And... there's a NEW $50 Drawing starting on my Lampwork Beads Website. 

Tuesday, February 1, 2011

Still Time to Heart Someone...

I've mentioned before how much I admire Janel Dudley of Janel Dudley Beads. She's the first Fire Diva I met in person. She manages the most popular axillary page of the Divas blog. She just posted a beautiful reminder that there's still time for for a little xoxoxo shopping for that big red heart day! Ladies, send your fellas shopping!


Sunday, January 30, 2011

One World One Heart 2011

Welcome to the fifth and  final blog hop adventure known as One World One Heart. I've been participating for a few years and visiting other blogs since the beginning. It's been a wonderful ride and I've made a few friends and gotten to know a lot of other bloggers along the way!

The blog hop is hosted by Lisa at  A Whimsical Bohemian and the rules are here♥  and I would like to add just ONE more for my players... PLEASE, please make it easy to get in touch with you if you win!!! I have several blogs and also have a team blog participating and in past years, people we cannot reach are passed over for someone who make it easy to get in touch with! So please, leave your email OR make sure your profile has an "email me" button!

A little bit about this blog: HollysFollyBeads is the blog devoted to my art and my passion (and the challenges...brutal honesty here!) of making beads from glass. I share the highs and lows and post cool tutorials from time to time. I love to participate in bead  and jewelry challenges particularly if the inspiration is an expressionist painting.
Goldfish necklace inspired by the Henri Matisse painting.

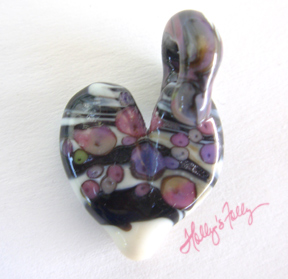
I'm giving away one of my off mandrel hearts (I just love to make these!): This one uses a special moody glass called raku and you never quite know what's coming out of the kiln. It will arrive on a rubber necklace and ready to wear.

To win: leave a comment (1) and make sure there is a way to reach you! 


You may want to visit my life in the foothills / dog blog for a different bead give away and... my handmade glass bead promotions group, The Fire Divas, are also hosting a HUGE giveaway!

Friday, January 28, 2011

Sail Boat Pendant

I didn't run away and hide...I got a JOB! OK - more like gig. I'm working on my first t.v. production in ages. It's been creative and fun and... exhausting. I've gotten to work with several people from my Carol Duvall days, including my Exec. Producer and Director and a few other peeps I haven't seen in ages!

I did have one productive torch session and the beads are still on the kitchen counter... waiting for a bath and a scrub. But I REALLY like them....

I thought I would share a pendant from my recent sale. One of my customer's bought the bead and had me turn it into a pendant. I really like the way it turned out.

When I make a pendant, I always try to think about how it hangs. Notice the top loop is made to run perpendicular to the neck, so the bead sits straight. The bottom loop runs parallel to the neck so you can see the dangles. I like my wraps tight so the bead doesn't spin (on beads like this). But that is a valid design feature on certain round beads. I also like the crystals on the top and bottom to continue the color of the bead as the eye moves up or down.  I used Champagne on the bottom and Indian Sapphire on top.

What do you look for in a pendant that you like to wear???

Saturday, January 22, 2011

Last day of the BIG SALE!

Just a reminder... THERE'S A CLEARANCE SALE GOING ON!!!
 It ends at the stroke of midnight tonight!!!

With prices like these, that means:

This gorgeous art-inspired glass bead necklace is a steal @ $112.00*

This extra large hollow glass shell bead is only $19.00*!


There are over 100 items on my website and another 80 on  Artfire. I realize I HAVE to get rid of some things in order to make room in my head / jewelry room / life for NEW things. Ebay being what it is, I would rather sell these babies to my friends and fans at a deep discount rather than to strangers on Ebay. So...  here's the deal on the sale:
  • 30% off for everyone.
  • 10% additional off for Newsletter Subscribers for a total of 40% off.
  • 20% additional off for Fan Page Member members for a total of 50% off. Join my Facebook Fan Page
  • FREE shipping on all orders over $150.00
  • Sale ends 11:59 p.m. the Saturday night 01/22/11
Da Fine Print:
  • VALID ONLY ON BEADS AND JEWELRY IN STOCK.
  • NOT VALID with FREE Bead Gift Certs. Free beads are FREE at the retail cost of the beads... Sorry!
  • NOT VALID on made to order items. In stock only.
  • NOT VALID on tools or kits.
  • NOT VALID on Etsy.... I don't want to deal with the discounts on their fees... And EVERYTHING is on Artfire anyway...where it's less expensive for me as an artist. Again, sorry!
Checking Out:
  • On HollysFolly.com w/a credit card: I will charge you the discounted amount when billing your card in the shop.
  • On HollysFolly.com and Artfire w/ Paypal: either wait for a corrected invoice OR pay and check out. I will  refund the difference upon shipping.
You must be a subscriber on a mailing list / fan page to get the discount additional discounts. Mention this deal for your discount! If you are reading this online and are not a subscriber, no discount will apply!


*Fan page prices used for the examples. 

Thursday, January 20, 2011

Off Mandrel Hearts

Hearts were the first thing I ever learned to make off mandrel. Although I frequently make leaves off mandrel too, hearts have always spoken to me. I find myself usually making at least one every torch session. I must admit, they are my favorite "jewelry." Despite being an avid bead maker and troubled jewelry designer, I often forget to wear jewelry. Even though I KNOW it's my best source of advertising, it's always an afterthought! I love being able to dash to my stash box, put a heart on a chain and go!

For this tutorial, you should know to keep glass warm in the flame. If you've worked on one side too long, give the other side a heat bath. I do NOT remind you of this in the tutorial... but it is crucial!!!

GLASS: 
If you are making canes, the leftover bits that end up in the water jar are a perfect and usually colorful place to start as I've done here. This can be a great end of day bead - a way to clean off your table.  But you can also start with a rod and some frit or stringer. If that's the case, you can start with Step three. This can be done in soft and hard glass. Just stick to your COE rules and percentages. You will need two rods to use as handles. I prefer a transparent or just clear as they take the heat better than pastels.

TOOLS: 

♥ Mashers   ♥Scissors ♥Corina's Magic Wand  ♥Delicate knife ♥Tungsten Pick ♥Reverse Tweezers*

DIRECTIONS:
  1. Here are two still glowing ends from a cane pull. Place them far back in the flame to avoid shocking.
  2. Usually, the larger one will crack. Try to crack it so the two pieces attach to each other.
  3. Melt in and square off. If starting with fresh rod, simply melt a gather and square off with mashers. You should end up with a pretty firm rectangle. If you like your color, keep going. If not, heat the paddle and twist with mashers to mix the colors better OR  heat the paddle and dip into some frit for interest . Melt in and square off again. The end without the punty will be the top of your heart. If you don't like that, attach another punty on a the side OPPOSITE of where you want your top to be.
  4. Get the paddle hot... red hot - but not drooping - on both sides. Use scissors to cut down the middle toward the rod - but not all the way to the rod.
  5. The cut marks will be a little raised and can be sharp. Take a moment to heat where you've cut and allow the rough edges to melt in. You can smooth this out a little Corina's magic wand or other small brass tool. Then you're ready to add a bail.

    Most people are always a bit off on the cutting...it's never 50/50. Eyeball the smaller side... that's where you will put the bail to give the heart visual balance. Keep the heart warm in your non-dominant hand and in your "good" hand, heat a pea sized gather. You can also melt some of that same frit into the gather but know that it will pull into lines for the bail.
    Note how the same frit used on the surface of this heart striated into lines when the bail was pulled.

    Gently touch down w/ the gather on the small side of the heart. Move the heart beside the flame and keep your bail rod in the flame so that you are heating the glass that will feed into the bail.

    Start stretching that gather. Bend it in the flame until it touches the back of the heart. Once it touches, flame break / twist off bailing rod.
  6. This step is  where many skimp... once you flame break the bail rod, your heart is still attached to the other rod at the bottom of the heart. Take a tungsten pick and use the flame to even up any thin spots in the bail. Add a drop of glass here. Heat and stretch there. If it collapses...drill a new hole with the pick (see below). I also take a pointy tool / pick / knife and make sure the bail really connects to the heart. Press or poke the connection points with a pick or knife. Get creative here: give it dimples or fingers... but make sure it's connected! Look at the dimple on this bail:

    You can keep the heart in the flame an infinite amount of time... just make sure the bail will hang true / straight and doesn't have thinner areas. Below, the ends of the bail are melted in and the hole is large.
  7. If surface decoration is desired, now is the time to do that. Flowers, other hearts...where ever you want to go...just keep the heart warm and don't allow the bail to get too hot! This is another great use for stray stringers on the work table.
    Example of Surface Decoration
  8. Once the bail is hanging true and any decorations have been added, I flash the tips of the reverse tweezers in the flame. They can't be icy cold! Grab the heart either by the bail or the crease left by the scissors.

    Place the handle rod in the edge of the flame until it twists and break off. It will most likely be a little wonky on the bottom...still kind of squared off.

  9. Use the heat to pull the glass into a more graceful shape by heating one side at a time until the glass flows down. All the working side to cool (good time to give some heat to the upper part of the bead) before repeating on the opposite side.

  10. Often the handle rod is clear. It's nice to give that bottom tip some color. If you started from a cane pull, use a bit of the same cane. OR stringer or more frit. Melt the tip in. 
  11. Finally, it's nice to draw the bottom of that tip to a nicer point or even a curve. Heat just above the tip and use the end of a warm rod to touch down, stretch the tip of the bead and break off in the flame. It's also a good time to put the bead on a tungsten pick and make sure it will hang properly. If not, return it to the tweezers, heat the bail and straighten it with mashers so that the heart will hang vertically.

    One last heat bath and in the kiln! But... check for tool marks... like I have here! ICK! Heat that out, do any final shaping and then...to the kiln.


THINGS THAT CAN / WILL GO WRONG: 

  • The holding rod could melt. Work further back in the flame and don't put so much of the rod in the flame. It needs to be warm...but not soft! You can marver it quickly to cool it down. Grab your mashers and re-center your heart before the rod sets firm again. 
  • The heart could fall off the holding rod or out of the tweezers. Pick it up with mashers or a pick...whatever is handy. Super heat where you want to punty while heating a punty rod, reattach and keep working. 
  • The bail could melt in. Use your tungsten pick to drill a hole. Do this by warming the bail a bit and moving it BEHIND the flame. Place the tungsten in the flame and when it glows, begin twisting your hand a bit to the right and a bit to the left. The tungsten will drill a hole in the glass! You may need to flip it around and work from the other side too. When the hole is all the way through, give it a little heat to smooth those rough edges created by the pick, recenter the bail and you're done.
  • The bail could be thin in places. Just add a few drops of glass, melt in slowly and add more if needed. Also, if you heat and stretch the bail hole, make sure both sides are warm for more even stretching. 
This is my final heart. It came out a bit darker than  I would have liked because I stopped and took too many pictures.  Keep in mind: if you use fussy glass, you will have unpredictable results.  


*I like my reverse tweezers to have a wooden grip as I hold the tip in the flame and the handles can get hot without something to protect you. Reverse tweezers give you one less thing to worry about while balancing all that hot glass in the flame. They hold the piece for you and you don't have think about keeping them closed.


----------------

If you found this tutorial helpful, please consider making a donation to the artist. Or purchasing a heart here. Thank you!