
Along comes Facebook and whatdayaknow??? Many of us who were ready to sell off our equipment have sales again! Turns out, customers like interacting with bead makers and jewelry designers in real time! Thank you Facebook!

And, as I shared before, each of the groups has their own rules... with active listings allowed ranging from a paltry one to a jumbo six! In order to make a living, you have to spread the listing love around. Plus, what doesn't sell in one place, very well may sell in another.
I try to list between six and eight items and generally sell about 1/2. That is including the oh-so-amazing five minute listing.... where someone calls BUY IT NOW while I'm still loading items!
Being that our stuff is spread between several sales venues, just HOW does one promote? Most Facebookers have learned to copy the link to their listing in the private group, upload a photo to their public page and paste the link. But if you have six or eight or more listings... How the heck do you promote that? You DO NOT want to do them one at a time. Seriously, not enough people will see it!
And that type of posting is problematic... Do you know what people see when they do not belong to the secret group??? This:

Why Promotion Is Important:
Before you even ask... as I was prepping this tut last week, l@@k what popped up in one of the groups!!!

That last comment - about search being hit and miss - is from an ADMIN!
Customers WANT to find you... they just don't know HOW!
Create Your Listings: As you go to the various pages, uploading your listings, you will want to open a sticky note or notepad to keep track of your links with a few word description for each. It may be helpful to you to keep your photos for each day's listings in one folder. I will be sharing my tracking docs with you all later in the week!
The Art of Collage:
After struggling and failing with this...showing single beads, reminding people to join, not getting views, I stumbled upon this technique. Make a collage... ONE photo of ALL your listings for any given day.
At first the idea overwhelmed me... but as I was researching hits for my glass bead promotions blog, I had a stunning realization hit me upside the head! I started to notice that certain posts got way more hits and clicks than others. When I started comparing to answer the why question... all those posts had one thing in common: a collage! On the days we show off a collage of beads, our hits nearly triple!
That was all it took to sell me!
Prep Your Pics:
Now I understand not all of you are Photoshop freaks. That's OK. But you should know how to size your photos for web viewing. The number one reason being, it makes your images that much harder to put into a catalog for someone else to try and sell your designs as their own. Plus your photos will load faster.
If you need help sizing your photos, I cannot recommend Online Image Editor highly enough! Aside from the kid friendly interface, they do not logo your photos!! (Many edit sites add their logo to your pic! Ewww!)
For Facebook, I make the longest edge of my photos 500 pixels. And the resolution for online viewing is 72 dpi. That gives me nice sized photo of my listings and a more than big enough image to make a collage.
Be Funky:
BeFunky is an app and online site that allows you to create a collage. They have a paid service with more options, but their free service is very generous. You can create a nice collage of your listings in minutes! This tut will walk you through their interface. By all means, if you have the skills to do this on another site or Photoshop... keep using it!
- On the collage page, the first tool on the left is photos. You are going to upload your pics of all your listings for the day. You will click on the little picture graphic next to the red 1. Use the pull down menu to tell Be Funky to search your computer and click the green Add Photos button. Upload each pic and they appear on the left side of the screen.

- 2 Templates - These are the collage templates
- 3 Backgrounds - This allows you to change the space between pics, round corners and add a background color.
- 4 Patterns - Prints to place behind pics.
- 5 Text - Add text in a variety of fonts. You can logo your pics with your name.
- 6 Goodies - stickers and such.
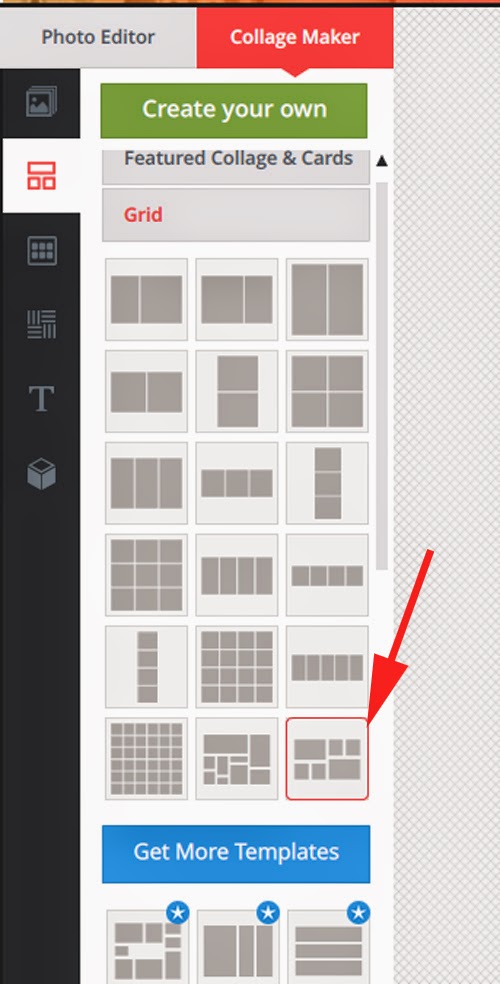
- Choose a template. The photo below shows all the free templates. Once you click Get More Templates, you are entering the paid area.

- I've selected a template. The site highlights it in red. (Note: for the example, I changed my mind after this pic was taken!)
- Start dragging pics over to the collage. Just drag and drop. If you mess up, hit the trash can in the upper corner to delete or drag to a different pane to make the photos swap places.

- Here, the red arrows show the drag tool engaged on the key heart bead photo.

- Save your image: Presuming you don't need any of the fancy stuff, you are ready to save! There is a menu bar along the top of the page (go back two pics to see it!). Save is the second button from left. When you hit it, this box pops up:

You can save directly to your personal Facebook page but not your fan page - so I don't bother. I always just save to my desktop. You can see the green yes next to desktop above. *More on collage ideas at the bottom!
- Name your file: I usually name mine by date... so I have a visual record of sales. And here's one quirk of BeFunky... it always takes the name and adds .jpg twice! In the example here July10.jpg.jpg I urge (BEG??) you to delete one of those! It can be confusing to some websites!

- Share to your FAN PAGE! Your fan page is your business portal to Facebook and ...you can't really share from your personal page to your fan page. In theory, that's where you customer's are looking for you.
This part is a bit of work and can be the most confusing. Create a post, and describe each listing in a few words. Try to do this in some logical order that follows your photo. For the collage at the top, mine would go like this:
Pink Coral Disks in Lampwork Bead Market {hyperlink}; Sasha pink and coral focal in Lampwork Auctions {hyperlink}; Clio orphan in Gone to Pieces {Hyperlink}
I would keep adding picture names / sales venue and links for each photo in the collage. Sometimes, I have to save, double check a link and go back in and edit. But you can edit!!
Here's a screen shot of that listing:

Note: You should update this... If something sells, you don't want customers getting that 'Content Unavailable' Screen. And... I personally think when people see your work selling, it places a higher value on that work! It makes people want to "jump on the bandwagon!" See my Tiny Heart listing in the middle of the page: SOLD!
Finally, I will add a comment reminding people they need to join. Sometimes I will post links to all the groups and above all, remind them I'm there to help...just ask!
- Share Everywhere! This is the most important step! Log out of your fan page and return as yourself. Share to your personal wall. Your friends and colleagues want to support you!
But that's not enough! Presumably, if you are selling on Facebook, you've already done some marketing there! I belong to several...many bead groups! This is where your networking really pays off.
Most of these pages allow you to share at least one item a day... well why not ONE photo with 8 beads on it! If you are sharing from your fan page, the link goes right back to your fan page. Where they can LIKE you! And if you are keeping up with your sales, they can see if something is sold or available!
If they comment or like or share... you are on your way to a viral listing!
Here is the perfect example... One set and I didn't share it. A whopping whole 63 people reached (which is decent for FB these days! On average, a listing like this may only get 25 views!):

And one I shared everywhere. 256 people reached!

Additional Promo Ideas: You want this to get out there. You want people to get the idea to go to your fan page to see what you have. Here's some other promotions... I do some most every day depending on my time frame.
- Link your fan page to twitter so all your posts go there and link back to your page!
- Have a prize drawing for your fans who like and comment on your listing posts! Even a modest giveaway will get you a few likes or comments! (NOTE: Asking for shares is against Facebook's Terms of Service and you do need to run disclaimers!)
- When you have a sale, update that post on your fan page and while you're emailing your customer about the sale, share the link with her! People will often buy something else to save on shipping!
- Blog your daily listings! How hard is it to upload a photo and paste in the links?? Mention your end times... build that sense of urgency!
- Share on any Jewelry boards or Lampwork Etc. A lovely pic gets attention!
- Share on Glass Beads Daily. The hyperlink (right click on the time of the listing / copy link location) of your listing on your fan page uploads with the photo! No manual upload. I just tweak the Link Title to read Daily Facebook Listings ends at 4pm Hollys Folly Glass Beads & Jewelry. You have 75 characters... say as much as you can!

*MORE Collage Ideas: As I've gotten better at understanding the power of the collage style promotion, I've been trying new ideas with great success!
- Plan your listings by color! If you don't have enough, choose the complimentary color or work in color triangles. Color grabs attention!
- List only focals of a certain style one day... or sets... or ribbed beads or angels... whatever you specialize in. Make the collage as cohesive as possible. Use the collages to let customers know what to expect from you.
- Develop a sales plan: Pages A & B on MWF / Pages X, Y, and Z on TTS. OR a color plan: Red beads on Monday, seasonal beads on Tuesday, Spacers on Wednesday... Try to develop a pattern!
---------------
If you enjoyed this tut and found it useful, please consider supporting the starving artist that wrote it.
My glass beads and tools are here.
My Starbucks account. Click the link and enter my card # 6044305060554270
Thank you!!!


3 comments:
Interesting read and some great tips - thanks Holly :)
This is a great post Holly. I held off from listing beads on the FB groups because it just felt completely overwhelming and I had no idea how to promote it. Thank you :)
Oh WOW HOlly, this is awesome!!! Thank you for sharing!
Post a Comment