Showing posts with label photography. Show all posts

Saturday, July 25, 2015

Saturday Night Special - Facebook Albums

Hi all! Tonight's Saturday Night Special is up on the fan page. I didn't want to forget it this week! It's a heart and I'm even offering a wire wrapped - ready to wear special:

Gathering Moss


I was reading a beadmakers tips page on Facebook and someone pointed out she always kept her available inventory in albums on Facebook... moving sold items over to a 'sold' album. This way customers can see at a glance what is available...or ask for remakes. 

I thought it was a great idea although I'm kinda embarrassed at the sheer volume of inventory I have! One of those bead makers who makes a bead  / sells a bead I am NOT! I recently sold a set of beads that had been listed on FB 28 times, on Etsy for over a year, countess times on ebay and even took a spin on my website! they were lovely, reasonably priced (actually sold for more than their original asking price though!) and purple! There is no telling what will sell and when. 

But I don't want to overwhelm the fan page with photos. So far, only the Sets and focals are up. But I will be adding more, then prices in the coming week. 

Happy Saturday and, as always, thanks for l@@king!

Wednesday, July 8, 2015

Fresh Glass | Where Have I Been??

Fresh Glass from July 1:  A Dark Waters long focal and 2 sets of earring pairs.

 I've been sorting through photos... trying to get in the listing habit and I'm just wondering where the heck I've been...for months?? I found folders of photos as far back as APRIL unedited! And then I keep finding the same photos that have been taken over and over and over. Sorting it out took me all day yesterday and several part-days before that. I'm finally editing photos from July and have five that need re-takes or supplementary shots. Sigh...

Do you ever feel you haven't really been in your life?? It's been a strange year and a busy one. I'm sitting here stunned it's half over.  But from long teaching assignment to back to back to back jobs, doing my own taxes for the first time ever, along with two sudden deaths of friends and one family member's prolonged illness and recent death and onto an extended work trip to take care of issues in my 92 year old mom's house followed by weeks of severe shoulder pain... I just feel like I'm on some kind of roller coaster that won't ever stop! 

I'm hoping that the sorting of pics and beads will get me back on track... OY! 

Sunday, July 13, 2014

Tutorial: Promoting Your Facebook Sales

It's no great secret that ever since Etsy allowed "additional makers," sales for so many handmade bead artists have tanked over there. We simply cannot compete with "bead makers" importing their stuff from China and selling it as first quality goods!

Along comes Facebook and whatdayaknow??? Many of us who were ready to sell off our equipment have sales again! Turns out, customers like interacting with bead makers and jewelry designers in real time! Thank you Facebook!

But almost all the sales venues are private, making sharing difficult. Customers have to join to even see what is available. I've been told by several admins that the sites get spammed around 20 times a day! All admins are very quick to remove the spam and ban the user.  But that means we sellers have to work a little harder to promote our wares. 

And, as I shared before, each of the groups has their own rules... with active listings allowed ranging from a paltry one to a jumbo six! In order to make a living, you have to spread the listing love around. Plus, what doesn't sell in one place, very well may sell in another.

I try to list between six and eight items and generally sell about 1/2. That is including the oh-so-amazing five minute listing.... where someone calls BUY IT NOW while I'm still loading items!

Being that our stuff is spread between several sales venues, just HOW does one promote? Most Facebookers have learned to copy the link to their listing in the private group, upload a photo to their public page and paste the link. But if you have six or eight or more listings... How the heck do you promote that? You DO NOT want to do them one at a time. Seriously, not enough people will see it!

And that type of posting is problematic... Do you know what people see when they do not belong to the secret group??? This:
You would think the good folks at Facebook would make it say: "Content from XYZ Beads is not available because you are not a member. Click here to join!" But it does not! Our customers have no point of reference of where to go... We are confusing them!


Why Promotion Is Important:

Before you even ask... as I was prepping this tut last week, l@@k what popped up in one of the groups!!!


That last comment - about search being hit and miss - is from an ADMIN!

Customers WANT to find you... they just don't know HOW!

Create Your Listings:  As you go to the various pages, uploading your listings, you will want to open a sticky note or notepad to keep track of your links with a few word description for each. It may be helpful to you to keep your photos for each day's listings in one folder.  I will be sharing my tracking docs with you all later in the week!

The Art of Collage: 

After struggling and failing with this...showing single beads, reminding people to join, not getting views, I stumbled upon this technique. Make a collage... ONE photo of ALL your listings for any given day.

At first the idea overwhelmed me... but as I was researching hits for my glass bead promotions blog, I had a stunning realization hit me upside the head! I started to notice that certain posts got way more hits and clicks than others. When I started comparing to answer the why question... all those posts had one thing in common: a collage!  On the days we show off a collage of beads, our hits nearly triple!

That was all it took to sell me!

Prep Your Pics: 

Now I understand not all of you are Photoshop freaks. That's OK. But you should know how to size your photos for web viewing. The number one reason being, it makes your images that much harder to put into a catalog for someone else to try and sell your designs as their own. Plus your photos will load faster.

If you need help sizing your photos, I cannot recommend Online Image Editor highly enough! Aside from the kid friendly interface, they do not logo your photos!! (Many edit sites add their logo to your pic! Ewww!)

For Facebook, I make the longest edge of my photos 500 pixels. And the resolution for online viewing is 72 dpi. That gives me nice sized photo of my listings and a more than big enough image to make a collage.

Be Funky:

BeFunky is an app and online site that allows you to create a collage. They have a paid service with more options, but their free service is very generous. You can create a nice collage of your listings in minutes! This tut will walk you through their interface. By all means, if you have the skills to do this on another site or Photoshop... keep using it!

  •  On the collage page, the first tool on the left is photos. You are going to upload your pics of all your listings for the day. You will click on the little picture graphic next to the red 1. Use the pull down menu to tell Be Funky to search your computer and click the green Add Photos button.  Upload each pic and they appear on the left side of the screen.
 The additional tools on the left are:
  • 2 Templates - These are the collage templates
  • 3 Backgrounds - This allows you to change the space between pics, round corners and add a background color.
  • 4 Patterns - Prints to place behind pics.
  • 5 Text - Add text in a variety of fonts. You can logo your pics with your name.
  • 6 Goodies - stickers and such. 
Truth be told... that's a lot of work... I only use photos and templates.

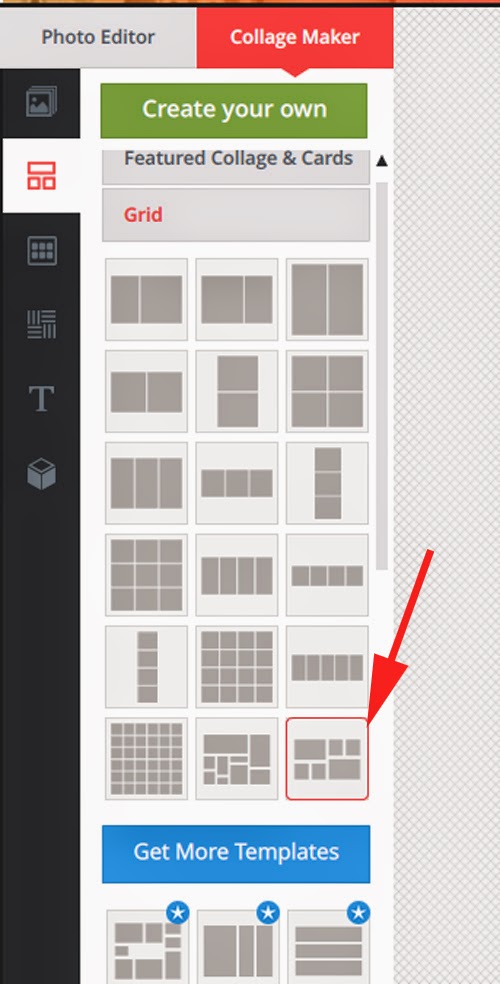
  • Choose a template.  The photo below shows all the free templates. Once you click Get More Templates, you are entering the paid area.


  • I've selected a template. The site highlights it in red. (Note: for the example, I changed my mind after this pic was taken!)

  • Start dragging pics over to the collage. Just drag and drop. If you mess up, hit the trash can in the upper corner to delete or drag to a different pane to make the photos swap places.

  • Here, the red arrows show the drag tool engaged on the key heart bead photo.

  • Save your image: Presuming you don't need any of the fancy stuff, you are ready to save!  There is a menu bar along the top of the page (go back two pics to see it!). Save is the second button from left. When you hit it, this box pops up:


You can save directly to your personal Facebook page but not your fan page - so I don't bother. I always just save to my desktop. You can see the green yes next to desktop above. *More on collage ideas at the bottom!

  • Name your file: I usually name mine by date... so I have a visual record of sales. And here's one quirk of BeFunky... it always takes the name and adds .jpg twice! In the example here July10.jpg.jpg   I urge (BEG??) you to delete one of those! It can be confusing to some websites!


  • Share to your FAN PAGE!  Your fan page is your business portal to Facebook and ...you can't really share from your personal page to your fan page. In theory, that's where you customer's are looking for you. 
This part is a bit of work and can be the most confusing. Create a post, and describe each listing in a few words. Try to do this in some logical order that follows your photo. For the collage at the top, mine would go like this: 
Pink Coral Disks in Lampwork Bead Market {hyperlink};  Sasha pink and coral focal in Lampwork Auctions {hyperlink}; Clio orphan in Gone to Pieces {Hyperlink}
I would keep adding picture names / sales venue and links for each photo in the collage. Sometimes, I have to save, double check a link and go back in and edit. But you can edit!!

Here's a screen shot of that listing:

Note: You should update this... If something sells, you don't want customers getting that 'Content Unavailable' Screen.  And... I personally think when people see your work selling, it places a higher value on that work! It makes people want to "jump on the bandwagon!" See my Tiny Heart listing in the middle of the page: SOLD!
Finally, I will add a comment reminding people they need to join. Sometimes I will post links to all the groups and above all, remind them I'm there to help...just ask! 
  • Share Everywhere!  This is the most important step! Log out of your fan page and return as yourself. Share to your personal wall. Your friends and colleagues want to support you! 
 But that's not enough! Presumably, if you are selling on Facebook, you've already done some marketing there! I belong to several...many bead groups! This is where your networking really pays off.
Most of these pages allow you to share at least one item a day... well why not ONE photo with 8 beads on it! If you are sharing from your fan page, the link goes right back to your fan page. Where they can LIKE you! And if you are keeping up with your sales, they can see if something is sold or available! 
If they comment or like or share... you are on your way to a viral listing! 
Here is the perfect example... One set and I didn't share it. A whopping whole 63 people reached (which is decent for FB these days! On average, a listing like this may only get 25 views!): 
 
And one I shared everywhere. 256 people reached!

Additional Promo Ideas: You want this to get out there. You want people to get the idea to go to your fan page to see what you have. Here's some other promotions... I do some most every day depending on my time frame.

  • Link your fan page to twitter so all your posts go there and link back to your page! 
  • Have a prize drawing for your fans who like and comment on your listing posts! Even a modest giveaway will get you a few likes or comments! (NOTE: Asking for shares is against Facebook's Terms of Service and you do need to run disclaimers!)
  • When you have a sale, update that post on your fan page and while you're emailing your customer about the sale, share the link with her! People will often buy something else to save on shipping! 
  • Blog your daily listings! How hard is it to upload a photo and paste in the links?? Mention your end times... build that sense of urgency!
  • Share on any Jewelry boards or Lampwork Etc. A lovely pic gets attention!
  • Share on Glass Beads Daily. The hyperlink (right click on the time of the listing / copy link location)  of your listing on your fan page uploads with the photo! No manual upload. I just tweak the Link Title to read Daily Facebook Listings ends at 4pm Hollys Folly Glass Beads & Jewelry. You have 75 characters... say as much as you can!

*MORE Collage Ideas: As I've gotten better at understanding the power of the collage style promotion, I've been trying new ideas with great success!

  • Plan your listings by color! If you don't have enough, choose the complimentary color or work in color triangles. Color grabs attention! 
  • List only focals of a certain style one day... or sets... or ribbed beads or angels... whatever you specialize in.  Make the collage as cohesive as possible. Use the collages to let customers know what to expect from you.
  • Develop a sales plan: Pages A & B on MWF / Pages X, Y, and Z on TTS. OR a color plan: Red beads on Monday, seasonal beads on Tuesday, Spacers on Wednesday... Try to develop a pattern! 
I hope you've found these ideas helpful in promoting your Facebook sales! 

---------------
If you enjoyed this tut and found it useful, please consider supporting the starving artist that wrote it.
My glass beads and tools are here.

My Starbucks account. Click the link and enter my card # 6044305060554270

My Paypal:


Thank you!!!

Monday, May 20, 2013

Tutorial: Creating Watermarks

Someone pointed out that my other tuts for marking your photos are really signatures, not a true watermark. So I thought I would write another tut!

This is the photo we're going to be watermarking. It already has a signature

Tools Palette: The tools we'll be using are: (not in order)Move Tool,  Eraser, the Type Tool, Colors Palette.  The tools palette appears along the left edge of your screen.

Type your text: Chose the capital T on the tools palette (left side of screen) and click onto your photo. Type your text.If you want a color, highlight and click on the colors palette... the box on top. This allows you to choose from a palette.
Move the Text: Click the Move Tool (upper left of Tools palette). Make sure your text layer is active in your layers palette (lower right), click over the text on your photo and drag it where you want it to appear.

NOW, here's where you have to make some choices!

  • What size should it be?  
  • Do you want your watermark to be solid or transparent, so your item shows through? If you sell on eBay, your listings can get pulled for doing this... BE AWARE! 
  • What direction do you want / need your text to appear?
  • Do you want it on top or behind your item? 
Size: Size should be proportional with your image. That being said, there are several ways to change it.
  • Select a clean large font and font size before you type OR
  • After you type, make sure your text layer is active in your layers palette and click CTRL and the letter T  (Edit Menu / Free Transform).  Click and drag. Drag top / bottom to make it taller. Drag either side for wider. Drag corners both! TIP: Hold your shift key while dragging on the corner to keep it proportional!

Solid vs. Transparent: Solid makes a statement but again some selling venues are disallowing this... the thought being that the buyer could say they didn't see the WHOLE item because it was covered.  But if you want solid, you are done!

For Transparent Watermarks: Make sure you have your type selected in your layers palette (horizontal arrow). Just above your layers, you should see the word "opacity" and  "100%"  further to the right (DOWN arrow below). Click the arrow by the 100% and slide it back to a lower number... Here, mine is on 25%... See how the type is allowing the background of the bead to show?


Text Direction: Let's say you need your text to be vertical. You can make text appear many ways in Photoshop bu let's not get too complicated here.  For vertical, again, make sure your text layer is active in your layers palette and click CTRL and the letter T  (Edit Menu / Free Transform).

A box appears around your text and you can turn it, using your move tool, to face another direction. You can invert it by dragging one end across the other! Once you are happy, hit enter. Use that move to to place it exactly where you want it.


Vertical Text: If you prefer actual vertical text, make sure your text layer is active in the layers palette, and from the menus choose Layers / Type / Vertical:

 And this is what you get:
In Front / Behind: All examples above place the watermark in front of the image.

Open the photo you want to watermark. In the layers palette (lower right), drag the layer over the new layer (paper) symbol to create a new background.

Alternate method: Layer Menu / New / New layer from Background.

Hide the top layer. Back to the layers palette / lower right.  Just turn OFF the eye ball next to the top layer by clicking on it.

Type your text and use the Layers palette to drag the text between the two photos:

 Take the eraser from the tools palette and erase the edges to reveal part of your logo:
 The downside is... the whole logo doesn't show... but this is one way to make photo thieves lives REALLY difficult... Spread your logo around! Simply drag the text layer to the duplicate layer icon (paper) and make a bunch of copies! Use your move to tool to line them up:

Now, that will take a bit of time to remove! You can even take the transform tool we used and make some of the layers smaller...see the tiny one on the lower right above???

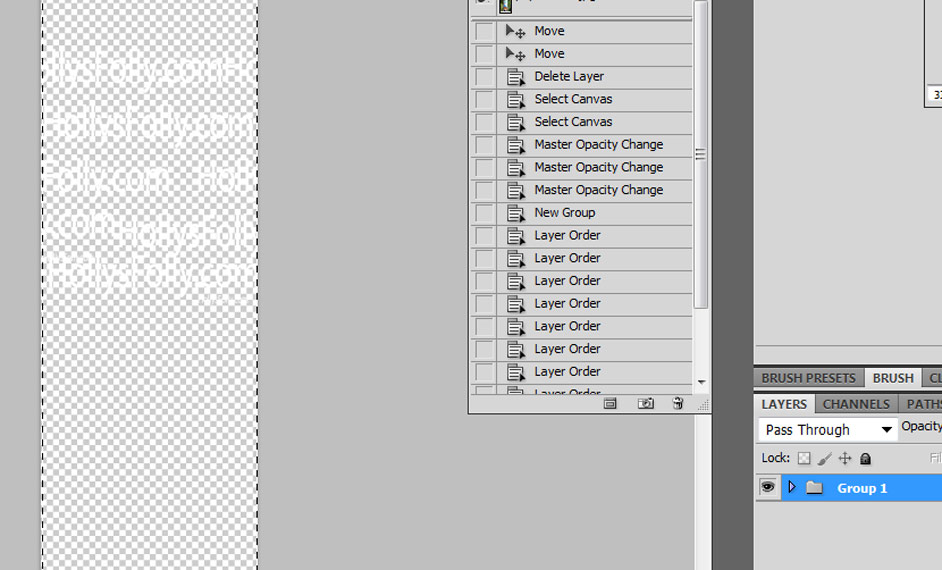
This is a pain to do every time but... you can SAVE YOUR TEXT LAYERS! Just delete the image layers and keep all the text.  Create a group for all the layers by clicking on the file folder at the bottom of the layers palette. Drag every text layer into that group.


From the photoshop file with the saved text. Make sure the group layer is selected in the layers palette. From the top menus, select Edit / Copy Merged.

Now, open another image you want to watermark. Paste the text. Mine is a bit big and messy:

But I hit CTRL  and the letter T for the transform box and size it down and hit enter:


Now, it's still too opaque and on top of my bead.

I hit the opacity slider in the layers palette. This one is 21%. And I make a copy of the background layer and put this new layer on top. Use the eraser to erase the edges of the top layer. (TIP: You can also use the Magic Wand Tool to select and remove the background.)


By saving your test file as a PSD (not as a jpeg...this flattens and creates a background, making your text invisible!) you can save yourself lots of time. If your products have several different shapes as mine do, you may need to create 3 or 4 of these in the beginning but a little set up can save loads of time later!

Final image:

 -------
I write tutorials on a variety of subjects from beading to web marketing. As a struggling artist, I appreciate your support to keep these tutorials going!
My glass beads and toolsPaypal


My Starbucks account. Click the link and enter my card # 6044305060554270


Saturday, December 29, 2012

Creative Highlights from 2012

I thought it would be fun to review some of my favorite projects from 2012. Looking over my blog posts from the last year, I'm happy to say it was fun and creative!

I was honored again to be selected for the Women In Glass issue of The Flow for one of my eye beads featuring the silvered glass eye murrini of  my friend Janel Dudley

I also won a photo contest sponsored by Archipeligo Botanicals to support breast cancer with this photo of my sister:


The bestie, her sister, a family friend and I planned our niece's wedding. I had a lot of fun making props for the photo booth and pulling off a most elegant wedding! Beading this ballerina (still in progress in this pic) for the candy table was most rewarding:


Which leads me to the most sentimental bead of the year:

That heart was made from the champagne bottle used to toast the nuptials. I framed it for the bride and groom with a story for them. The whole post is here.

Speaking of sentiment, I made a record number of Memorial beads... far more than shared here. For some of my customers, the memories are too fresh and painful so I don't even ask if I may share. Others...something magical just happens and I feel so blessed to have been a part of that grief process. (I have one of those to share.... but, you'll have to wait til next year!) While this work takes a lot out of me emotionally.... I'm SUCH a sensitive redhead... it is the MOST rewarding.


I found several color combinations that I simply adore this year. The Rio Party series was just plain fun and I had to make a necklace for myself:

My other favorite is from the Uptown Girl series... I just love the red and black with a little sparkle:


But my all time favorite bead of 2012 is this bent bead made in Kim Neely's Ether colors:

It was a challenging and creative year and I'm hoping that 2013 is  even more so and hopefully a little more profitable!

Happy New Year to all of you!


Monday, August 13, 2012

How to Logo Your Photos

Many people have asked me how I logo my photos. It's a simple brush in Photoshop. If you are selling on the web, Photoshop is a program you need. While it's not the easiest thing to use, many community colleges offer classes. It is a wonderful program to have skills in!

Why have a logo? It sets your work apart. It gives folks something immediate to reveal the maker. They don't have to look at my bead and wonder, "Who made that?" The logo is a great reminder! I also belong to several bead teams on Etsy and Facebook. It's easy for my work to get lost in the crowd... but not with a logo! It also makes it a little bit harder for those photo stealers to swipe your work! First, a look at that logo: 

  1. SCAN the image: For the Holly's Folly logo, I scanned the image into my computer and I kept it fairly large. It's best to use black ink on clean white paper. Scan the image at 300 dpi even though the logo may be used mostly onscreen which only requires a dpi of 72. The higher resolution keeps the image crisp and clean and if you ever need to print your work, your logo will always look snazzy! 
  2. MAKE the Brush: Open your image file in Photoshop. Go to your Edit Menu / Define Brush Preset. A new window pops open asking you to name your bush. Keep the title short as the brush selection window will be tiny. I made three brushes for Holly's Folly: HFlogo (flat / straight), HFlogoR (angled to the right), and HFlofoL (angled to the left). 
  3. SAVE the Brush: Just because the brush appears in your brushes window...doesn't mean it's saved there! If you change brush palettes, you can lose that brush! To save: a) Make sure you are in the brushes palette. b) Go to the Brushes pull down menu and c) over to the brushes fly out menu. d) Select Save Tool Presets. A menu will open requesting a name. I store my brushes in my Basic Brushes that came with Photoshop but I name it Logos.


  4. USE the Brush: Select the brush palette from the left side tool bar. A brush menu appears across the top of the screen with a pull down menu. To the right of that is a symbol & number that represents the current brush selected with another pull down menu. Click that and all the brushes available in this tool preset appear. Click on the logo you want.  Here, I've selected the logo for my stamp business.
An outline of your brush will appear and it is usually too large for your photo. I had to take a photo of my dusty screen for an example you could see.The red arrows are pointing to the white outline of my logo and it is way too big! To make it smaller, I hit the [ symbol repeatedly until it fits the area needed. To make it bigger, hit the ] key. Click where you want the brush to appear.


Here is the finished photo of the image using that logo:


5. Use COLOR:To make things more interesting and make your logo stand out, use the eye dropper tool on the left tool palette to select a color in your image. This changes the color in the foreground color palette of the left tool bar and that changes the color your tool will stamp.


Summary: 
1) Scan image / large file / set to black and white.  
2) Edit / Define Brush Preset
3) From the Brushes flyout menu / Save tool Presets
4) Select the brush from the brushes drop down / size using the bracket tools [ & ]
5) Change the color to match your image  using eyedropper or foreground color palette tools.
6) Click to make the brush appear on the photo.

---------------
If you enjoyed this tut and found it useful, please consider supporting the starving artist that wrote it.
My glass beads and tools are here.

My Starbucks account. Click the link and enter my card # 6044305060554270
My Paypal:


Thank you!!!